Tech In Plain Sight: Magsafe, And How To Roll Your Own

Apple likes magnets. They started out with magnetic laptop chargers and then graduated to a system that magnetically holds the phone, charges it, and can facilitate communication between the phone and a charger or other device. Even if you are like me and have no Apple devices, you can retrofit other phones to use Magsafe accessories. In fact, with a little work, you can build your own devices. Regardless, the technology is a clever and simple hack, and we are just a little sorry we didn’t think of it.

Terms

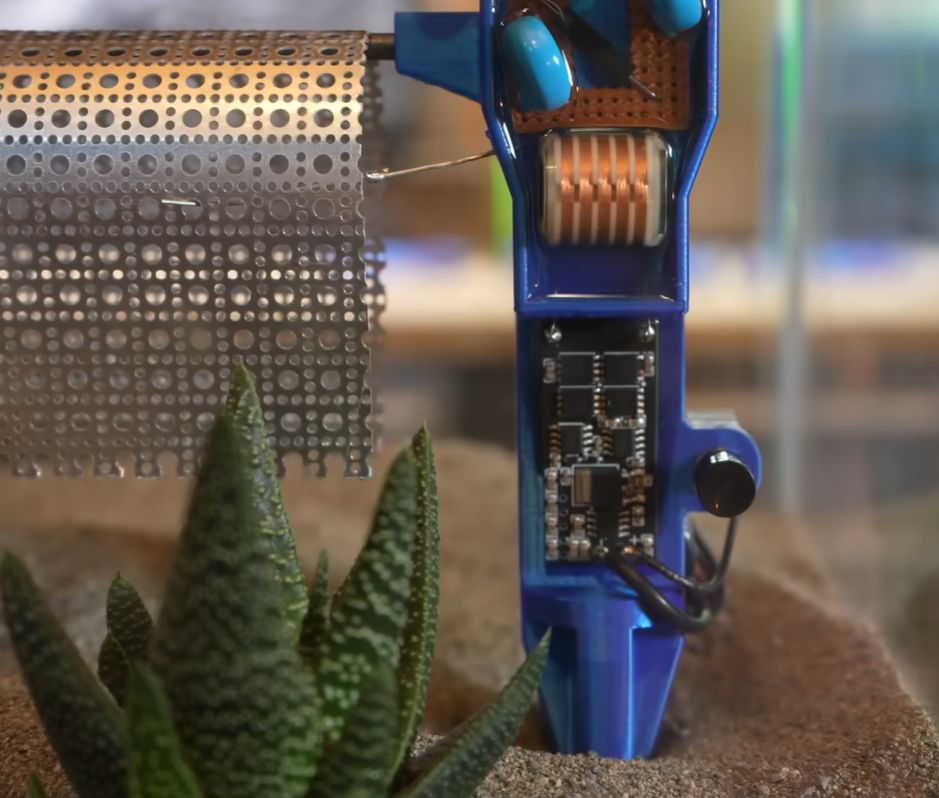
Using a magnet to attach a phone isn’t a new idea. But, historically, the phone had either a metal back or an adhesive metal plate attached that would stick to the magnet. This wouldn’t necessarily help with charging, but was perfectly fine for holding the device. The problem is, it is hard to wirelessly charge the phone through the metal.

Magsafe can do several different things. Obviously, it can attach the phone magnetically. However, since it is a ring shape, you can still have a charging coil in the middle of the ring. Better still, the Magsafe system will align the phone and charger with a satisfying click when you put them together.

Continue reading “Tech In Plain Sight: Magsafe, And How To Roll Your Own”

BlackBerry Keyboard Makes This Handheld Pi Stand Out

In the decade or more since small inexpensive Linux-capable single board computers such as the Raspberry Pi came to the mainstream, many a hardware hacker has turned their attention to making a portable computer using one. With such a plethora of devices having been made one might think that the Pi handheld was a done deal, but every so often along comes a new one of such quality to re-ignite the genre. So it is with [Taylor Hay]’s BlackberryPi Handheld. As you might guess from the name, it uses a BlackBerry keyboard along with a square LCD screen to create a beautifully executed Pi handheld in an almost GameBoy-like form factor.

It starts with a beautifully designed and executed case that holds a Pi and a Pimoroni HyperPixel screen. Unexpectedly this is a full-size Pi, we think a Pi 4. The keyboard is a USB enhanced Blackberry module which also has the famous trackpad, and there’s a bezel on the front to protect the screen. The power meanwhile comes from three 18650 cells inside the back of the case, with a power bank PCB. The surprise here is how simple he’s made it by careful choice of modules, the usual rats-nest of wires is missing.

The files are available so you can make your own, and he’s actively encouraging people to remix and improve it. We like this project, a lot, and after you’ve seen the video below the break, we think you will too. Oddly, this isn’t the first time we’ve seen someone try this combination.

Continue reading “BlackBerry Keyboard Makes This Handheld Pi Stand Out”

PCB Dielectric Constant Measurements, Three Ways

FR4 is FR4, right? For a lot of PCB designs, the answer is yes — the particular characteristics of the substrate material don’t impact your design in any major way. But things get a little weird up in the microwave range, and having one of these easy methods to measure the dielectric properties of your PCB substrate can be pretty handy.

The RF reverse-engineering methods [Gregory F. Gusberti] are deceptively simple, even if they require some fancy test equipment. But if you’re designing circuits with features like microstrip filters where the permittivity of the substrate would matter, chances are pretty good you already have access to such gear. The first method uses a ring resonator, which is just a PCB with a circular microstrip of known circumference. Microstrip feedlines approach but don’t quite attach to the ring, leaving a tiny coupling gap. SMA connectors on the feedline connect the resonator to a microwave vector network analyzer in S21 mode. The resonant frequencies show up as peaks on the VNA, and can be used to calculate the effective permittivity of the substrate.

Method two is similar in that it measures in the frequency domain, but uses a pair of microstrip stubs of different lengths. The delta between the lengths is used to cancel out the effect of the SMA connectors, and the phase delay difference is used to calculate the effective permittivity. The last method is a time domain measurement using a single microstrip with a couple of wider areas. A fast pulse sent into this circuit will partially reflect off these impedance discontinuities; the time delay between the reflections is directly related to the propagation speed of the wave in the substrate, which allows you to calculate its effective permittivity.

One key takeaway for us is the concept of effective permittivity, which considers the whole environment of the stripline, including the air above the traces. We’d imagine that if there had been any resist or silkscreen near the traces it would change the permittivity, too, making measurements like these all the more important.

Continue reading “PCB Dielectric Constant Measurements, Three Ways”

To Test A (Smart) LED

Adding LEDs to a project used to be enough to make it cool. But these days, you need arrays of addressable multi-color LEDs, and that typically means WS2812B or something similar. The problem is that while it was pretty easy to test garden-variety LEDs, these devices can be a bit harder to troubleshoot. [Gokux] has the answer, as you can see in the video below.

Testing these was especially important to [Gokux] because they usually swipe the modules from other modules or LED strips. The little fixture sends the correct pulses to push the LED through several colors when you hold it down to the pads.

However, what if the LED is blinking but not totally right? How can you tell? Easy, there’s a reference LED that changes colors in sync with the device under test. So, if the LEDs match, you have a winner. If not… well, it’s time to desolder another donor LED.

This is one of those projects that you probably should have thought of, but also probably didn’t. While the tester here uses a Xiao microcontroller, any processor that can drive the LEDs would be easy to use. We’d be tempted to breadboard the tester, but you’d need a way to make contact with the LED. Maybe some foil tape would do the trick. Or pogo pins.

Continue reading “To Test A (Smart) LED”

Flow chart containing directions on how to determine if you should use this toolkit as a resident, business owner, civic activist, or government official

Hackable Cities

There are many ways to hack the world. Graduate students at Parsons The New School for Design developed a guide for hacking the biggest piece of technology humans have developed – the city.

One of the things we love here at Hackaday is how hacking gives us a tool to make the world a better place for ourselves and those around us. Even if it’s a simple Arduino-based project, we’re (usually) trying to make something better or less painful.

Taking that same approach of identifying a problem, talking to the end user, and then going through design and execution can also apply to projects at a larger scale. Even if you live in an already great neighborhood, there’s likely some abandoned nook or epic vista that could use some love to bring people out from behind their screens to enjoy each other’s company. This guide walks us through the steps of improving public space, and some of the various ways to interact with and collate data from the people and organizations that makeup a community. This could work as a framework for growing any nascent hacker or makerspaces as well.

Hacking your neighborhood can include anything: a roving playground, a light up seesaw, or a recycling game. If you’ve seen any cool projects in this regard, send them to the tipsline!

3D Print An Instant Camera

Instant photography occupies a niche in film photography that has endured despite its relatively high cost and the ease of newer digital technologies. There are two main manufacturers, Polaroid and Fujifilm, as well as a few smaller boutique camera makers. Into this comes [Toast], with an entirely 3D printed instant camera, not a Polaroid as he calls it, but one for Fuji Instax Mini film.

Currently available instant film comes in cartridges in which each picture is a layered design with a sachet of developing chemicals at the end. Once the film part has been exposed it is developed by passing through a set of rollers which squeeze the chemicals evenly over the film, allowing it to develop. The camera in the video below the break is simple enough, a pinhole box camera design, but the huge challenge and the interesting part of the video comes in the developer attachment which has those rollers. It’s considerably more challenging than it might at first appear, and he goes through many iterations before getting it right with some steel rollers.

The 3D print files are available but only at a price, and despite that we think there’s enough in the video below for anyone who wants to experiment for themselves. For the rest of us it’s an insight into a technology we all know about, but maybe have never looked closely at.

Instax has appeared here before, usually as an instant back for older cameras, but sometimes for far tastier projects.

Continue reading “3D Print An Instant Camera”

Harvesting Water With High Voltage

Atmospheric water harvesting is a way to obtain fresh water in arid regions, as there is always some moisture in the air, especially in the form of morning fog. The trick lies in capturing this moisture as efficiently as possible, with a range of methods available that start at ancient low-tech methods involving passive fog droplet capture all the way to variants of what are effectively large dehumidifiers.

A less common way involves high-voltage and found itself the subject of a recent Plasma Channel video on YouTube. The inspiration for the build was a 2018 paper by [Maher Damak] et al. (PDF) titled Electrostatically driven fog collection using space charge injection.

One of the two stakes that make up the electrostatic precipitator system for atmospheric water harvesting. (Credit: Plasma Channel, YouTube)

Rather than passively waiting for dew to collect on the collector, as with many of the methods detailed in this review article by [Xiaoyi Liu] et al., this electrostatic approach pretty much does what it says on the tin. It follows the principle of electrostatic precipitators with a high-voltage emitter electrode to ionize the air and grounded collector wires. In the video a small-scale version (see top image) was first constructed, demonstrating the effectiveness. Whereas the passive grid collected virtually none of the fog from an ultrasonic fog maker, with 35 kV applied the difference was night and day. No water was collected with the first test, but with power applied a significant 40 mL was collected in 5 minutes on the small mesh.

With this scale test complete, a larger version could be designed and tested. This simplifies the emitter to a single wire connected between two stakes, one of which contains the 20 kV HV generator and battery. The mesh is placed right below it and grounded (see image). With an extreme fog test inside a terrarium, it showed a very strong effect, resulting in a harvest of 14 mL/Wh for this prototype. With a larger scale version in a real-life environment (i.e. desert) planned, it’ll be interesting to see whether this method holds up in a more realistic scenario.

Continue reading “Harvesting Water With High Voltage”